
2019 Pacific Northwest Fly Tyers Rendezvous

It’s time for our annual Swap Meet!
We all have rods, reels, fly boxes, tools, etc. that we no longer use or need that we might be willing to trade, sell, or just give away. Someone else in the club might be on the lookout for one of those very items.
You might have an old rod, reel or line that someone might want for a grandchild. Bring ’em!
Maybe you have an old vest or rain jacket that just doesn’t fit well anymore. Bring it!
Perhaps you don’t tie flies anymore but still have some equipment or supplies. Bring ’em!
You probably upgraded something recently and don’t know what to do with your old stuff. Bring it!
We will swap, dicker, barter, buy, and sell. I hope to have time for members to share stories, memories, and tall tales about their fishing experiences. It should be a fun evening and might be the perfect time to bring along a family member or two. See you next Tuesday, July 17th.

For the past few months we have focused our attention on large streamer or steelhead patterns. Partly because steelhead fishing has been less than stellar, perhaps it is time to begin focusing on trout patterns again. This month we will be looking at a small mayfly that is so widespread we should be able to put it to good use on almost any northwest stream or river.
At our March Fly Tying Night we will be tying up a blue wing olive emerger pattern called The Smurf Emerger. Credit for this creation goes to John Smeraglio of The Deschutes Canyon Fly Shop in Maupin. When John last spoke at our meeting in April of last year he gave us the details of the fly, including the recipe. It has few materials and is an easy pattern to tie, as long as you have good eyesight or have some kind of magnifiers for the smaller sizes. Club member Lane Hoffman has shared with me that it is an easy to tie pattern and is very effective, especially in the smaller sizes.

Adult Blue Wing Olive
First, a little background about Blue Wing Olives. Mayflies come in a great number of of sizes and colors, with around 2500 species worldwide, and about 700 species in North America alone.They can be divided into four major groups based on the behavior of the nymph stage of each species: the Swimmers, the Crawlers, the Clingers, and the Burrowers. The Blue Wing Olives, or BWO’s as they are known affectionately by flyfishers, fall into the Swimmer category of mayflies. This is important to flyfishers because the nymphs use their tails to help them swim around and that frequently carries them out into moving water where they can be easily taken by trout.
Blue Wing Olive is a common name for a large group of mayflies within the Baetis family, made up of over 150 species. They are present in all kinds of waters and it would be difficult for a flyfisher to collect aquatic life samples by screening any stream or river without collecting some BWO’s. Individuals of all species exhibit similar looks and behavior, with small differences that would be important only to an entomologist (insect geek), but not to the average angler. And the name itself for the BWO group can be confusing at times to the angler because not all mayflies that fall into the blue wing olive category have blue tinted wings or olive colored bodies.

Blue Wing Olive Nymph
On our western rivers we can find BWO’s hatching strongly from September through April, but extending through the end of spring. Along with midges, the BWO’s are the flies that the trout fishers can rely on during the colder months of the year. If you are seeing mayflies size 16 or smaller chances are they are some variety of blue wing olive. Pheasant tails and hare’s ears are good nymph imitations. Baetis cripples, CDC cripples, and soft hackles, along with the Smurf Emerger are good BWO emerger patterns. The adult BWO is well matched by Sparkle Duns, Comparaduns, and Parachute Baetis patterns.

Adult Blue Wing Olive Emerging
Fishing Tips:
The emergers can be presented just as you would a dry fly, although the emerger may rest just under the surface film. You can cast upstream and let it dead drift past you and finish the cast by letting it swing across the current. I have had decent success in some waters fishing the emerger as a dropper off a dry fly or even off a nymph. Moderate to slower moving water, including eddies are good places to fish BWO patterns. And don’t forget those foam lines which seem to concentrate the insects, and therefore also concentrate the fish.
Fishing BWO imitations may appeal to many of you because it doesn’t require you to get up early and you don’t have to fish until dark. The peak time for BWO hatches is mid-day through early afternoon. And curiously, the best BWO hatches seem to be on overcast or drizzly days.
Tying Tips:
When trying to match a blue wing olive hatch, the size of the patterns is critical. BWO’s get up to size 16 at the most, and the majority are 18’s and 20’s, with some species being 22’s. The smaller sizes can be challenging but you should have a variety of sizes in your flybox. Whether it is a nymph, emerger or adult, start tying the 16’s and work your way down as you master the process. Finer thread sizes will make the tying of smaller flies less frustrating and you will be happier with your finished product. I have become fond of Veevus 14/0 thread.
Join us at the Royal Treatment Fly Shop in West Linn on Wednesday, March 28 for our next Fly Tying Night. We’ll be meeting at 6:00 pm sharp to tie up some of John Smeraglio’s Smurf Emergers. Hope to see you there!
Just a short reminder about the Northwest Fly Tyer & Fly Fishing Expo in Albany on March 9th & 10th
Here’s a link for more info: http://www.nwexpo.com/


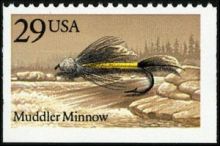
Back in October the guest speaker at our club’s meeting was Kevin Erickson who gave us a fine presentation that centered on his new book, “Feather Craft: The Amazing Birds and Feathers Used In Classic Salmon Flies”. It was readily apparent to most of us that we have neither the skills nor the patience to produce the quality of flies that Kevin is crafting. Amazing stuff! (I clearly remember him saying that the completion of a Jock Scott fly required 32 different materials. Whew!) At the conclusion of his talk Kevin graciously offered to come to one of our Fly Tying Nights to lend us a hand in improving our fly tying skills. After explaining to Kevin that our tyers are not quite ready for classic salmon flies, we decided to focus on the Muddler Minnow as a fly that would teach us some new skills that haven’t yet been emphasized in our monthly fly tying sessions.

Although perhaps not as in favor as it once was, the Muddler Minnow, or Muddler as it is commonly called, is still the“go to” fly of some flyfishers and the Muddler should occupy a spot in your fly box. I have come across a few testimonials to the effectiveness of the Muddler. At a fly shop I met a gentleman that has had terrific success fishing only Muddlers, in various colors, for steelhead on the Deschutes. And famed flyfisher and author Gary Lafontaine is said to have only fished Muddlers in a variety of forms and sizes for one year and reported that he had landed as many fish as if he had fished his usual array of patterns. And the historical importance of the fly to the tradition of fly fishing in this country was emphasized in 1991 when the US Postal Service included the Muddler Minnow as one of only five flies in its fly fishing stamp series.
The Muddler Minnow has played an important part in my fly tying history as it was the first fly that I ever watched being tied. My dad, brother Steve, and I were fishing at Diamond Lake when I was probably 10 and my brother was 8 years of age. A hot tip told us that a couple of fly patterns were very productive late in the day. We wandered over to the resort and found an elderly gentleman outside tying flies and selling them as fast as he could tie them. We were both fascinated watching the man fashion Muddler Minnows and another pattern from miscellaneous materials sitting on his fly tying bench. We purchased a few and had great success fishing the flies on a very slow troll far behind the boat on unweighted monofilament line using spinning rods, with the fishing getting better and better the darker it got late in the evening. (Fishing flies in this manner was a welcome relief after trolling Ford Fender flashers around all day.) I guess there is reason to think that the same success could be had at Diamond and other lakes, using a flyrod and a Muddler Minnow some 60 years later. At least it ought to be worth a try.

The Muddler Minnow was first tied by Don Gapen of Anoka, Minnesota back in 1937 for use in pursuing brook trout on the Nipigon River in Ontario. Gapen’s family ran a couple of fishing resorts and Don later started the Gapen tackle company that is still a family owned business today. Their online catalog shows that they still carry the Muddler Minnow but they also have some lure offerings with intriguing names such as the Ugly-Bug, the Bait-Walker, and the Walk-N-Lizard. It looks like a lot of their products are aimed at the pike and muskie fishers in their area.
When you look at the original Muddler Minnows you will notice that they are kind of scraggly, almost messy looking, compared to what we commonly see in fly boxes today. The heads of Don Gapen’s Muddlers were largely left untrimmed as is seen in the photos below.


It is interesting to note that the Gapen family today still sells Muddler flies that resemble the original version and have testimonials that state that they fish just fine. One reviewer says, “Just like movies, the original is usually the best. I tie and fish both original and modern muddlers and found the original out performed the modern on many occasions.” A lot of us that tie flies today like them to look nice and neat in our fly boxes. Maybe we are trying to tie for ourselves and not for the fish.
Credit for the appearance of today’s Muddlers generally goes to famed Montana tyer and flyfisher Dan Bailey. The dense and neat heads that he developed back in the 1950’s require a process of spinning and packing the deer hair, followed by a trimming done with scissors or a razor blade. Muddlers today typically employ mottled turkey quill segments for the tail and wings and gold or silver mylar for the body. Often there is an underwing of squirrel hair and a collar of deer hair. The variations and colors of Muddlers today is limited only by the tyer’s imagination, but the one thing that all Muddlers will have in common is a head of spun deer hair. A densely packed head provides plenty of flotation but the flies can be tied weighted or unweighted according to the targeted species and water conditions.


Some Variations of Muddler Minnows
From its name the Muddler Minnow will mimic a variety of small “minnow” fish like shiners, chubs, and dace. Weighted and fished along the bottom the muddler is a great sculpin or tadpole imitation. But the Muddler is a versatile fly that is said to mimic a variety of other life forms like grasshopper and crickets. Tied in a variety of sizes, Dan Bailey often used the Muddler as a late summer grasshopper imitation on his favorite Montana rivers.

A Muddler Minnow Variation Called A “Spuddler”
Nothing can be ruled out when deciding what is the proper way to fish a Muddler. Quick and irregular strips may be effective at times, but on some days and for some fish a simple down and across swing may be just the ticket. Gary Lafontaine reported that while a retrieve using rapid wild strips was effective for bass, a smooth strip with less action was much more effective for trout. Unweighted Muddlers can be very effective as a waking fly for steelhead while a weighted pattern fished at or near the bottom using rests between short strips can be a fine sculpin imitation. So it sounds like anything goes when fishing a Muddler. Good advice is probably “If what you are doing is not working, try something different.”

Take advantage of having Kevin Erickson on hand for our next Fly Tying Night. Join us at the Royal Treatment Fly Shop in West Linn on Wednesday, Feb. 28th for an evening of hair spinning, packing and trimming. As always we will be getting started at 6:00 pm sharp.
Hope to see you there!

If the turnout at last month’s fly tying night is any indication, there seems to be a good amount of interest in winter steelhead fishing. As we move into the season it makes sense to continue our focus on winter steelhead patterns. But this month we will vary it up a bit by tying a tube fly.

Famed steelheader Lani Waller has become a a big promoter of fishing with tube flies. Waller was not the originator of using tube flies for steelhead and he freely admits that the system he uses is a result of experimentation and refinement by himself and others over a number of years. Waller has been fly fishing for over fifty years and his name became synonymous with fly fishing for steelhead when he came out with a set of three videos on the topic for Scientific Anglers 3M back in 1984. His evolution in steelhead angling made a quantum leap in 1997 when he was fishing with guide Bob Clay on the Kispiox River, a tributary of the famous Skeena River in British Columbia. Waller was reluctant to try the tube flies that Clay offered for fear that the small hooks on the tube flies would not hold up to the strong 20 plus pound Skeena system steelhead. But during a week of fishing Clay landed one hundred percent of the fish he hooked while Lani landed sixty percent of his hooked fish. That certainly turned Waller into a believer. When I first read that story I figured that if tube flies got Lani Waller’s attention they were definitely worth looking into.

So what is a tube fly, anyway? Well, tube flies differ from traditional flies in that they are tied on some kind of tube material instead of being tied on the shank of a metal hook. Tubes today are often made of different kinds of plastic or metal onto which are fastened the usual array of thread, feathers, hair and flash materials that normally go into the tying of a fly. The angler then ties a short shank hook onto the tippet material which has been threaded through the tube. The hook can then be pulled into a soft plastic junction tube that has been attached onto the back of the tube fly.

And who came up with this revolutionary idea? Well, that depends on who you talk to or where you look. The vast majority of sources that I came across give credit for the first tube flies to Minnie Morawski, a fly dresser who tied flies for the Charles Playfair Company in Aberdeen, Scotland back in 1945. Minnie was apparently using the hollow quills of bird feathers for her tubes. But then I found references to a British angler named Alexander Wanless who actually published a book with colored drawings of some tube flies in 1932. It is possible that Wanless is less often credited for the earliest tube flies because he was mostly a spin fisherman and the idea caught on later with the fishermen that really embraced the tube fly…the fly anglers. In the USA, tube flies were first used in patterns that were trolled behind boats. Although it undoubtedly happened earlier, the first documented use of tube flies in this country for casting for salmon or steelhead was in the Puget Sound area in 1985 (Fly Fishing for Pacific Salmon by Ferguson, Johnson, and Trotter). Traditional flies tied on hooks surely remain the most common type of artificial fly, but tube flies are now used worldwide for nearly all species of fish that are sought by fly anglers.

Tube Flies (the two flies on the left) from the 1932 book by Alexander Wanless
You may wonder why would anyone bother with tube flies in the first place. Well, there is a definite upside to tube flies due to a number of advantages that are often quoted in a variety of resources:
1. More fish landed— The short shank hook results in less leverage for a fish to throw a hook (see the example above of Lani Waller on the Kispiox)
2. More hook-ups— The positioning of the hook in the junction tube toward the rear of the fly can help eliminate short strikes by fish nipping the tail of the fly
3. Longer fly life— A strike by a fish will often cause the hook to be pulled free of the tube, causing the fly to slide up the leader away from the jaws of the fish
4. Easy to change out hooks— If a hook becomes dull or damaged it is easy to swap it out for a brand new laser sharp hook right out of the package
5. Easy storage of flies— Without the hooks on, it is easy to store a bundle of tube flies together without them getting all tangled up

Don’t be intimidated about tying tube flies. If you have tied a traditional fly before, you can tie a tube fly. The same basic skills are used to tie materials onto a plastic tube instead of tying onto the shank of a metal hook. Join us for our next Fly Tying Night and give tube flies a try. We will be meeting at The Royal Treatment Fly Shop in West Linn on Wednesday, Jan. 24 at 6 pm. Hope to see you there!


For some of us the dropping temperatures and the falling leaves are signals that the annual approach of winter steelhead fishing is just around the corner. Instead of traveling to the Deschutes for our steelhead “fix” we are able to stay closer to home and fish local waters like the Clackamas and Sandy rivers. So now is the time to get ready by checking those fly boxes to make sure you have a full arsenal of winter steelhead patterns.
When asked to give me the name of a likely winter steelhead fly candidate for our November Fly Tying Night, two of my regular sources of information, Josh Linn and Dave Kilhefner, both mentioned the fly with the promising name of “Metal Detector”. When searching for a grab by a steelhead it makes sense that you can hardly go wrong with a fly called the Metal Detector.
Northwest guide Marty Sheppard is credited with coming up with the Metal Detector series of flies. Marty and his wife Mia have been the owners since 2003 of Little Creek Outfitters, a guide service based in Maupin. They specialize in swinging flies with both two handed and single handed rods and regularly guide on the Deschutes, Grande Ronde, John Day, and Sandy rivers.
Marty, along with his friend Josh Linn, experimented with a variety of materials in hopes of coming up with a large profile fly that was also easier to cast than some of the flies on the market at the time. The key turned out to be using materials that don’t soak up a lot of water. This makes the Metal Detector flies lighter and thus easier to cast than many flies. And we all know that heavy flies and sink tips can turn a promising day of fishing into an unpleasant chore. Marty Sheppard’s fly was originally tied with bucktail but now is also tied with finn raccoon. Both materials are buoyant, absorb little water, and don’t clump together when wet. Polar chenille, while also absorbing little water, is included in the body to give a translucent glow from the inside out. The flies are finished off with some flash and a marabou collar which provides added movement in the water. Trailing stinger hooks are used to help ensure the greater chance of a hookup.

Metal Detectors are usually two toned flies with favorite color combinations being black and blue, and red and orange. Black and blue is especially good on overcast days, dark conditions, or when the water is off color. The red and orange flies are preferred in bright sunlight or when the water is especially clear. It is interesting that all of the Metal Detectors I found in fly shop bins were tied on metal shanks, while Dave Kilhefner says that Marty actually ties his own on tubes.
Join us at The Royal Treatment Fly Shop in West Linn on Wednesday, November 29th to tie up some Metal Detectors for the start of winter steelheading. It would be helpful if you brought your own super glue along with your vise and fly tying tools. As always, we will start at 6:00 pm. Hope to see you there!

While sitting in my pontoon boat last Spring at Rocky Ridge, I was smugly thinking I had cracked the code there. I had already released a number of nice fish caught on a variety of patterns and was therefore feeling pretty good about myself. That is until I started paying attention to how Dave Kilhefner was doing. It quickly became apparent that Dave was out-fishing me, and everyone else, by a big margin. Every time I looked over he was either playing a fish, or netting a fish, or releasing a fish. When I finally kicked over close enough to talk, I had to ask… “OK, Dave, whatcha usin’ “. A “Green Devil” was all I was able to make out from across the water. That didn’t do me any good because I didn’t have any “Devils”. In all truth I didn’t even know what a “Devil” was. So all I could do was give him a nod, as if to indicate that I knew exactly what he was talking about. It wasn’t until lunchtime when Dave got out his vise to tie up a few more “Devils” (the others were shredded) that I was able to see that he was talking about a marabou jig pattern. He thought that just calling it a “marabou jig” was simply too generic of a name. Dave wanted a name with a little more pizazz, hence “The Devil”. And then after reading the article about last month’s smallmouth bass fishing on The John Day River where he had good success with a “White Devil”, I thought OK, that is enough; it is time to look more closely into this Devil jig fly. I know Dave would not take credit for being the originator of marabou jig flies because they have been around forever, but for the purpose of this article I am going to give the Devil even some more pizazz and call it “Dave’s Devil”. I think it is appropriate to at least give Dave some credit for bringing jig flies to our attention.
Like most things involved with flyfishing it is possible to get started with jig flies at different degrees of immersion. Where you fit in would be based on your level of interest and the amount of time you have available:
1. “Get It And Go” Level— You can just go down and purchase already-made jig flies and off you go fishing.
2. “One Step Further” Level— You can purchase plain jig hooks that come with weighted heads and then use your fly tying skills and materials to create your own jig flies.
3. “All In” Level—At the far end of the spectrum are those folks that are fishing junkies (Dave would be included here). These are the people who take things one big step further and purchase equipment to melt lead down and then pour it into jig head molds containing bare jig hooks, thus creating their own weighted jig hooks. This is followed up with the final steps of tying the fly.
TIPS FROM DAVE
I asked Dave a number of questions regarding jig flies, so…
Why use jig hooks?
They give a lot of motion to the fly. They sink better than bead heads. And they are weighted so that the hook point rides up, helping to avoid snagging the bottom and/or dulling the hook on rocks.
What kinds of fish have caught on your jig flies?
Trout and steelhead mostly. But they also work well for bass and salmon.
I see that jig hooks come with the eyes at different angles. Which do you prefer?
The 90 degree eyes work better when pouring lead into the molds.

90 Degree Eye Jig Hook
The 60 degree hooks work well with slotted tungsten beads for Czech style nymphing. It’s the hottest new thing.

60 Degree Eye Jig Hook
What size lead heads do you prefer on your jigs?
1/32 oz. or 1/64 oz. for Devils for trout; 1/16 oz. for steelhead if using a rod that can handle it (8 wt.). Jig heads also come in 1/80 & 1/100 oz sizes and these are great for tying fur nymph jigs like Hares Ears and Red Fox Squirrels.
What color of Devils do you prefer?
olive-green or white
(On the internet people also seem to like black and brown for trout. Brighter, more garish colors can be useful for bass/crappie/panfish.)

Two of Dave’s favorite colors
What colors do you use on the head of your Devils?
Coloring the head is really not necessary. But I use orange or pink for “fly box appeal”.
I use an orange head for the green Devils and a pink head for the white ones. There is really no logic at all to this.
(People on the internet are all over the place on this subject. Everything from “Painting is a waste of time; an unpainted lead jig head is just fine”, to “It is essential to color the jig head”. Sounds like a good topic for experimentation.)
Are there other ways to create weighted jig heads than buying them or pouring your own?
You can tie lead eyes above the “elbow” of a bare jig hook. Or you can tie lead eyes onto the top of a standard woolly bugger type hook.
(Also…On the internet I saw one guy crimping and super gluing a lead split shot onto the elbow of a bare jig hook. Might be worth a try.)
How do you like to color the heads of your Devils?
Because you only need one coat to get the perfect color, and for its superior durability, powder-coating is the way to go. (There is lots of info on the internet on how to do this.)
Are there alternative ways to color the heads?
Cheap…Base coat with white nail polish then paint colored nail polish over it; then add a final coat of clear like Sally Hansen’s Hard As Nails.
(I went with fingernail polish in preparing for our next Fly Tying Night. I found out that the white undercoat was essential in order to get the final colors to come out bright. Also a downside of using fingernail polish is the vapors/fumes. Some of us don’t have a lot of spare brain cells so make sure you have plenty of ventilation. Also there is a lot of internet chatter about the pros and cons of enamel, lacquer, and vinyl spray paints for jig heads.)

Colored jig heads ready for the final fly tying materials
I see that some people heat-treat the heads after coloring them? Do you bother with the heat treatment step? If so, how do you do it?
Powder coating is the most durable finish but you have to bake it in the oven to take advantage of the durability, but powder coating doesn’t give off fumes like nail polish. It’s easy, just hang the jigs on the oven rack and bake at 275 for 30-40 mins.
Baking is good for nail polish, too, but it creates some fumes so you have to air the place out and you don’t want your wife home while it’s going on 😉 .
The Devil you gave me had a body made of chenille. Do you ever use other materials for the body?
Sometimes I make them like hares ear nymphs.
Do you ever add flash to your Devils? (in the body? in the tail?)
I started to experiment but didn’t follow-up on it much. I think some rubber legs would be good to try.
How do you like to fish “The Devil”?
In lakes I like to fish them like a woolly bugger, but give them more time to sink/drop before stripping and retrieving. Fish in lakes seem to like to take them when they are falling. In streams or rivers I dead drift them under an indicator.
Anything else of interest or importance?
Use a short leader, 4-6’. That makes them easier to cast.
Don’t go too heavy with the weighting of the jig head; heavier heads are hard to cast and you run the risk of breaking your rod.
__________________________________________
So there you have it. After watching Dave wear himself out pulling in fish I think the jig flies are worth a try. Join us at the Royal Treatment Fly Shop in West Linn on Wednesday, October 25 to tie up some “Dave’s Devils”. I will have some weighted jig hooks, chenille, and marabou for some basic patterns. Bring other materials if you want to dress them up a bit. We will start at 6 pm. Hope to see you there!

You can add as much as you want to your Dave’s Devil.
The Green Butt Skunk

After a hiatus from the tyer’s table it will be good to get back to our monthly fly tying sessions. Heading into the fall months of the year the thoughts for many of us turn to swinging flies for steelhead on the Deschutes. In spite of the dismal prediction we are hearing about the outlook for steelhead on that river, it’s important to think positively and keep telling yourself that this year you may just have to work a little harder to find the fish that has your name on it. And always remember, just getting out on the water is a reward in itself!
Instead of looking at some hot new pattern I thought it would be good to look closely at a truly classic steelhead fly and some of its history. An Oregon attorney is credited with being the creator of the Green Butt Skunk. As happens in the world of fly tying, existing patterns continually evolve as new fly tyers add their own innovations in an effort to improve the effectiveness of the fly. That is the case with Dan Callaghan. It is thought that Dan most likely came up with his idea for the Green Butt Skunk in the 1950’s, tying it for the steelhead on his favorite river, the North Umpqua. He added some chartreuse chenille to an already existing steelhead pattern, The Skunk. If you are not familiar with The Skunk, just visualize something close to a classic Green Butt Skunk, minus the green butt. Adding the green butt apparently turned an already good steelhead fly into an iconic pattern used today by steelheaders in all parts of the world.
The true origin of the original Skunk may have been lost to time but the earliest mention of the fly seems to credit a Seattle gentleman named Wes Drain back in the 1930’s. Some sources say the name came from the general black and white color of the fly and some say that early examples used hair from a skunk. Apparently Drain’s original recipe actually called for a wing made of skunk hair, white over black. What better source of both black and white hair than a skunk! You can imagine that a single skunk skin would have provided early tyers with a lifetime of material for Skunk flies. But thank goodness we have a variety of other wing materials to use today because I can’t imagine where in our house my wife would allow me to keep a skunk skin!

The original Skunk fly
But being an innovative fly tyer was far from being Callaghan’s only claim to fame. A lawyer by trade, he lived in Salem his entire life. After discovering fly fishing for steelhead on the North Umpqua, Callaghan made it his life’s mission to do all he could to protect that river. He was one of the founders of both The Steamboaters and The North Umpqua Foundation, two organizations that are focused on protecting the North Umpqua River. Callaghan was a very accomplished photographer, and after his death in 2006 Callaghan’s wife helped to publish a book called Dan Callaghan’s North Umpqua, a collection of 156 of his photos taken over a period of fifty years. He was also a member and supporter of many conservation and flyfishing organizations, too many to list here. But if you ever feel like you have too many things going on in your life to participate in or support conservation and flyfishing, check out this link, to read more about Dan Callaghan’s dedication and accomplishments:
http://callaghanpublishing.com/about.html
Another tribute to Callaghan was conceived by his good friend Steve Bukieda, along with Joel LaFollette to honor his memory. The plan was to display some variations of the Green Butt Skunk as a way to honor its creator. It came to be known as “The Dan Callaghan Collection – 101 Green Butt Skunks”. An idea that started out to be a modest display of a few variations of the Green Butt Skunk soon snowballed to the point that the number of flies had to be cut off at 100. The 101st fly in the display is one that was tied by Callaghan himself. LaFollette accompanied the impressive 3-panel display down to Salem for its official unveiling at the state Capitol. It was later auctioned off for $6,300, with the proceeds going to the North Umpqua Foundation to protect fish habitat. The winners of the auction chose to remain anonymous and wanted the collection to be displayed in a place where it could be enjoyed by the public. If you haven’t already seen it, stop in at The Royal Treatment Fly Shop in West Linn where it is on display. If you are like me, you may have seen the collection there but never examined it very thoroughly. Upon looking closely at the names of the tyers, you will undoubtedly recognize many of them. It’s almost a “Who’s Who” list of noted Pacific Northwest fly tyers and steelheaders, as well as recognizable names from outside the area. It is interesting to see in one place how 100 other tyers have their own take on Dan Callahan’s fly. Indeed it is certainly an appropriate and impressive tribute to the man who brought us the Green Butt Skunk, arguably the most recognizable of all steelhead flies.

Joel LaFollette and Mary Kay Callaghan, Dan Callaghan’s wife with “The Dan Callaghan Collection– 101 Green Butt Skunks”
A few Green Butt Skunks should be in the flybox of every steelheader. Join us for our next Fly Tying Night on Wednesday, Sept. 27. As always, we will be meeting at The Royal Treatment Fly Shop in West Linn at 6 pm.


